Hello, quilters!
As a child, I used to play with that folded-paper fortune
teller with my friends! Remember
those? It was fun to make up answers (or
fortunes), fold the paper origami-style and, finally, get an answer to some
silly questions.
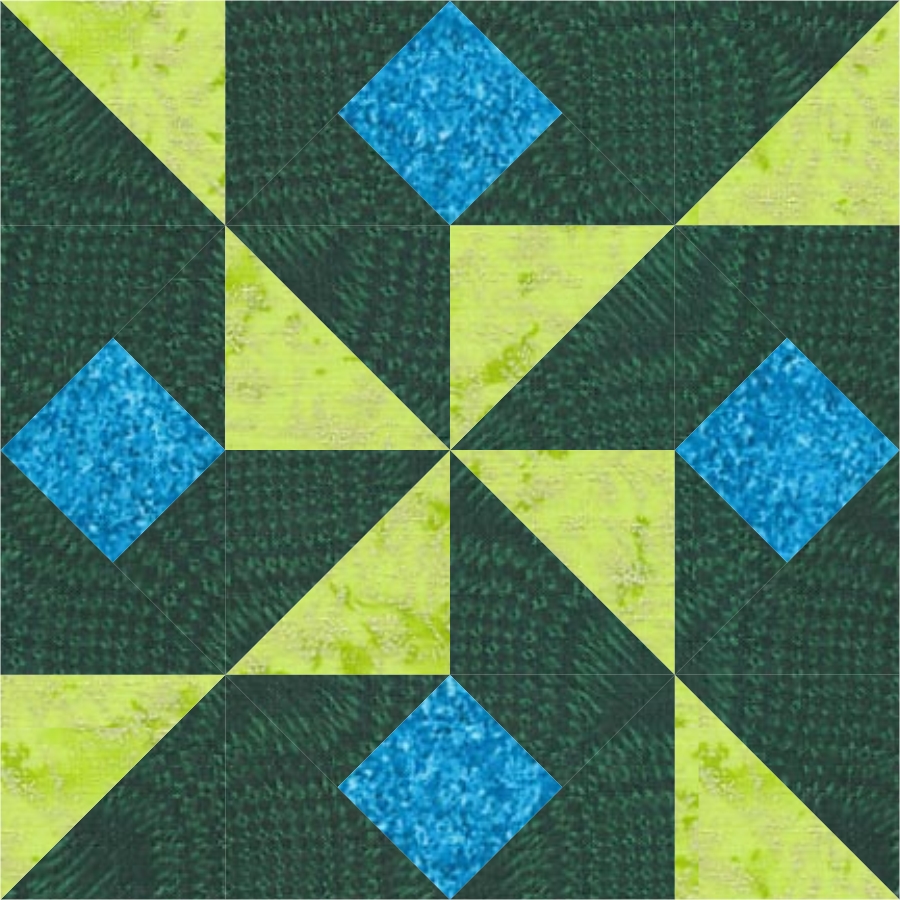
When I finished making my block for Quiltmaker’s 100 Blocks,
the on-point squares reminded me of a paper fortune teller. I soon discovered that it’s also called
Whirlybird - like a helicopter! Well,
with the movement the triangles create in the block, I had to call it Whirlybird!
You can use this block in so many ways. Sew a dozen of these blocks and you can
easily make a lap size quilt with three blocks across and four blocks
down. Add a little border to frame it
and, voila, you have a really neat quilt with pinwheels everywhere! Here it is made with fabrics from the Improv Collection by Benartex.
You can add sashing for easier construction and add a neat
border print. Here I’ve used the Surf’s
Up collection from Northcott fabrics.
Isn’t that a neat quilt to cuddle with at a beach house?
Red Pinwheels or Blue Pinwheels???
One of my favorite design elements is an unusual
sashing. I could not resist creating one
to go with this block! Can you tell what
the sashing looks like from this quilt picture? (Sashing picture below!)
(Garden Party fabrics by Michael Miller)
I purposely created this sashing so that none of the seams
match any of the block seams! It makes
sewing the quilt go so much easier. Here's another version:
Can you figure out the sashing yet?
Here’s what that sashing looks like:
It is constructed of two 3” finished Square in a Square
units, separated by a 1” x 3” finished rectangle with a 2 ½” x 3” finished
rectangle on each end. The main thing
really is to make sure the points on those Square in a Square units don’t get
cut off when you sew the quilt together.
So, you will need a good 1/4” seam allowance at those points.
Mark a 2” unfinished square (white in the picture below) on one diagonal. I typically use a mechanical pencil for
this. It’s pretty accurate as it has a
fine point and the line comes out just the right skinny width. Using a regular No. 2 pencil is tricky
because the line usually ends up being too wide. You will be using this line as a stitch line
so it’s really important for the best accuracy that this line isn’t wider than
your thread.
Place this square on one corner of a 3 ½” unfinished square
(green in the picture). Match up the raw
edges and sew just a tiny hair’s breadth to the left of your marked line. When you fold back and press the sewn
triangle, it should match up the raw edges.
When it does, you can trim the extra layers underneath. If it doesn’t match, you may want to unstitch
and re-sew it again.
Repeat marking and
sewing on all four corners of the green fabric to get a Square in a Square unit.
If you want a bed quilt, a quick way to do it is to
alternate the block with a pretty print square.
Set it on point and you will see this block from a whole different
perspective!
(Washington Depot Collection by Free Spirit Fabrics)
So, what’s your favorite setting and the colors you would
most likely use for Whirlybird? Leave a
comment with your answers and please be sure to include a way for me to contact
you (you can’t win if you leave a no-reply comment!). US only please. I will be choosing two winners who will both
receive a copy of Quiltmaker’s 100 Blocks Volume 16, one from me and one from
Quiltmaker!
Just one more...
Happy Trails!