Friday, November 17, 2017

On The Road Again....


Hello, quilters!


  Are you enjoying the Road Rally? It’s the last day for the Quiltmaker’s 100 BlocksVolume 16 Blog Hop but I know you are still finding fun and interesting stuff on the designer blogs!   


As a child, I used to play with that folded-paper fortune teller with my friends!  Remember those?  It was fun to make up answers (or fortunes), fold the paper origami-style and, finally, get an answer to some silly questions. 


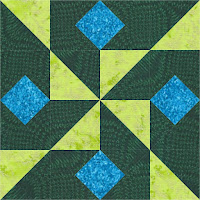
When I finished making my block for Quiltmaker’s 100 Blocks, the on-point squares reminded me of a paper fortune teller.  I soon discovered that it’s also called Whirlybird - like a helicopter!  Well, with the movement the triangles create in the block, I had to call it Whirlybird! 


You can use this block in so many ways.  Sew a dozen of these blocks and you can easily make a lap size quilt with three blocks across and four blocks down.  Add a little border to frame it and, voila, you have a really neat quilt with pinwheels everywhere!  Here it is made with fabrics from the Improv Collection by Benartex.


You can add sashing for easier construction and add a neat border print.  Here I’ve used the Surf’s Up collection from Northcott fabrics.  Isn’t that a neat quilt to cuddle with at a beach house?   


Red Pinwheels or Blue Pinwheels???  

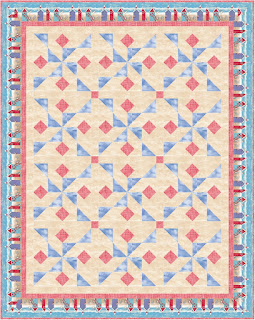
One of my favorite design elements is an unusual sashing.  I could not resist creating one to go with this block!  Can you tell what the sashing looks like from this quilt picture? (Sashing picture below!)


(Garden Party fabrics by Michael Miller)


I purposely created this sashing so that none of the seams match any of the block seams!  It makes sewing the quilt go so much easier.   Here's another version:  


Can you figure out the sashing yet?  

Here’s what that sashing looks like:


It is constructed of two 3” finished Square in a Square units, separated by a 1” x 3” finished rectangle with a 2 ½” x 3” finished rectangle on each end.  The main thing really is to make sure the points on those Square in a Square units don’t get cut off when you sew the quilt together.  So, you will need a good 1/4” seam allowance at those points. 

Mark a 2” unfinished square (white in the picture below) on one diagonal.  I typically use a mechanical pencil for this.  It’s pretty accurate as it has a fine point and the line comes out just the right skinny width.  Using a regular No. 2 pencil is tricky because the line usually ends up being too wide.  You will be using this line as a stitch line so it’s really important for the best accuracy that this line isn’t wider than your thread.

Place this square on one corner of a 3 ½” unfinished square (green in the picture).  Match up the raw edges and sew just a tiny hair’s breadth to the left of your marked line.  When you fold back and press the sewn triangle, it should match up the raw edges.  When it does, you can trim the extra layers underneath.   If it doesn’t match, you may want to unstitch and re-sew it again.  


Repeat marking and sewing on all four corners of the green fabric to get a Square in a Square unit. 


If you want a bed quilt, a quick way to do it is to alternate the block with a pretty print square.  Set it on point and you will see this block from a whole different perspective! 

(Washington Depot Collection by Free Spirit Fabrics)

 So, what’s your favorite setting and the colors you would most likely use for Whirlybird?  Leave a comment with your answers and please be sure to include a way for me to contact you (you can’t win if you leave a no-reply comment!).  US only please.  I will be choosing two winners who will both receive a copy of Quiltmaker’s 100 Blocks Volume 16, one from me and one from Quiltmaker! 


Just one more...


Happy Trails!
Tuesday, October 24, 2017

Mini Quilt Show!

Throughout the year, I make quilts for a variety of publications.  It's a good bet that I hardly remember when a project is actually published because of the lead time.  So, I may be making a quilt in March for publication in October!  Or making a winter quilt in the middle of summer.  It can get really confusing!

But, sometimes, it can be utterly wonderful when several projects are published or become current at the same time!  So, in this post, I give you a mini-quilt show of several of my current projects!  

If you have received your Fons and Porter Love of Quilting November/December 2017 issue, you may have seen Cornerstone.
November/December 2017 Issue.  Picture courtesy of Fons and Porter Love of Quilting.
Sneak peek at Cornerstone.  Picture courtesy of Fons and Porter Love of Quilting.
 Cornerstone is a lap size quilt that was pretty easy to assemble despite how complex it looks!

By the way, here's a picture of Hillside Harmony from Quilting Quickly September/October 2017 issue.

Hillside Harmony.  Picture courtesy of Fons and Porter Quilting Quickly.
Hillside Harmony is a scrappy quilt that I had a lot of fun designing.  I just love how the yellows and reds pop against the blue and green background fabrics.

I have single patterns available right now through Annie's Catalog.  One of them is Christmas Cookies, a lap size quilt that Annie's Catalog is offering as an Exclusively Annie's Quilt Design.  
Christmas Cookies.  Photograph by Annie's Publishing. Used with Permission.
Another pattern is a favorite of mine, Drifting Snow.  It is a table runner that is also being offered as a Exclusively Annie's Quilt Design.
Drifting Snow.  Photograph by Annie's Publishing. Used with Permission.
In the Winter 2017 issue of Quilter's World, is City View.  It has a geometric and modern feel in shades of blue and green (even the background is a pale blue!).
City View, Quilter's World Winter 2017.
 Photograph by Annie's Publishing. Used with Permission.
City View was published with complete AccuQuilt die-cutting instructions.  It was so easy and fast to use my fabric cutter to cut the pieces for this project.  I confess, I use my AccuQuilt fabric cutter more and more these days.  The cutting just goes so much faster and, with the accurate shapes, the piecing is just so much easier!
Speaking of which, also check out my project tutorials on the AccuQuilt Blog!  The latest is a pattern for a Christmas Bell Pull!    I used silk, wool and cottons and I added some beading for that extra bling!

I hope you enjoyed my mini-quilt show here!  I am off to Quilt Market this weekend and I can't wait to see what's new in the quilting world!  


Wednesday, September 27, 2017

The Fons and Porter Experience

I'm so delighted to report that I have projects in a couple of Fons and Porter publications.  The first, "Orange You Sweet?", is in the Love of Quilting September/October 2017 issue and is also available as a kit or a pattern.

The quilt is made with fabrics from the Bleecker Street and Harmony Collections from Quilting Treasures and wonderfully machine quilted by Anne Cowan.  

I was also invited to appear in the second episode of the current 3000 TV Series!  It was quite a thrill to do the filming - it was my first time to film a tutorial and, to get comfortable, I just did my best to imagine all my quilter friends and students behind the cameras!  Everyone was so friendly and fabulous.  I can't thank Vanessa, Diane, Colleen and Sara enough for their patience in guiding a newbie through this process!

You can contact your local PBS station to find out if and when they are airing the Fons and Porter Love of Quilting TV Series or you can get the DVD of each season.  I saw some of the other projects in the 3000 series and I am in awe!  It's well worth getting the DVD. 

A second project, "Hillside Harmony", appears in Quilting Quickly September/October 2017 issue.  It is made with fabrics from the Harmony Collection from Quilting Treasures.  More on this in a future blog.  In the meantime, here are both quilts with the magazines and the TV series DVD with Mini, my cat, enjoying them!

Truthfully, Mini just wanted to get in any picture I was taking that day!  Cats have minds of their own!


Friday, June 23, 2017

Latest news!

It's been an eventful few months!  But, here's the latest news.  Last week, I did an AccuQuilt demo at our local guild, County Line Quilters.  It was a wonderful experience!  AccuQuilt provided a prize package consisting of a GO! fabric cutter, a GO! Qube and a strip die.  


It was TO DIE FOR!  The winner would only need to "add fabric" and for us quilters, you know that's really not a hard thing to do.   Drawing the winner's name was the very last thing we did that evening and Pat K., who really wanted it, actually won the prize package.  So, it went to a great home!    Congratulations, Pat!


This week, the 2017 Row by Row Experience began.  At our local quilt shop, The Round Bobbin (in Ambler, PA), everyone has been busy sewing the samples and putting kits together.  "From Sea to Shining Sea" is the shop row and you can check it out on Facebook!   Here's a sneak peak!
While I wrote the pattern, it is based on Susan S.'s idea (she also made it!) and Susan A. machine quilted it perfectly! 

Speaking of Susans, my latest AccuQuilt blog tutorial using the GO! Sunbonnet Sue die has been published. 

Sunbonnet Sue is such an iconic quilting figure, it was a puzzle to come up with new ideas to present her.  Family events this past spring finally inspired my project.  I have three sisters (including another Susan!) who I do not see often.  It's even harder for us to all get together in one place at one time.   So, the blog tutorial this month is a "portrait" of my sisters and I as Sunbonnet Sues!  Check it out!  

More news to come soon!  Watch for it!  Until next time...